
Why a Lab Computer?
Cybersecurity professionals make use of a wide range of tools that run primarily on a Windows or Linux operating system (OS). Security techniques often involve tracking the communication between multiple machines on a network. Rather than building out dozens of special-purpose physical computers on a local-area network or cloud, this environment can be simulated with virtual machines (“VMs”). VM platforms are capable of hosting a “computer within a computer,” allowing for a “host” computer to run multiple isolated operating system environments, all within the operating system of the host.
So, a single dedicated lab computer at home allows you to spin up virtual machines in a contained, secure sandbox without dealing with those pesky cloud charges or having to consume precious resources on your personal desktop system. Most security professionals have home lab environments used for learning and simulating scenarios. In fact, many cybersecurity interviews include the question: “What is your home lab like?” In this series, I’ll show you what a complete answer looks like.
Hardware
For my home cyber range, I wanted a computer that, while affordable, still offers specifications that facilitate virtualization. Having used server blades in the past, I ruled those out early on due to their noisy fans and steep power consumption. In the IT home lab community, the Dell Precision T3600 is highly regarded as a unique value point due to its support for an 8-core CPU (a CPU with an astonishing $30 price tag on eBay). I sourced mine from a local computer shop, but alas it only came with a quad-core CPU with the following specs:
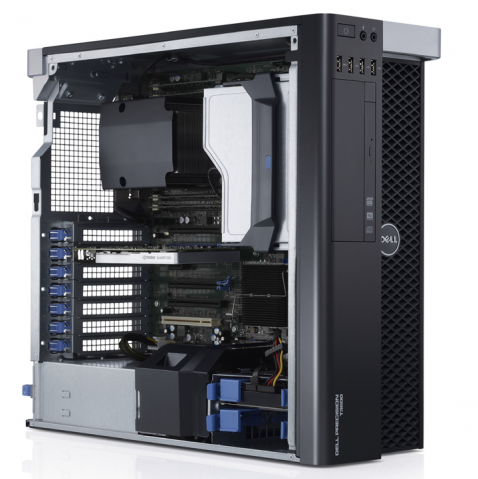
- CPU: Intel Xeon E5-1603 Quad Core 2.8GHz Processor
- GPU: 2x AMD/ATI Turks GL FirePro V4900
- RAM: 32GB
- Hard drive: 128GB SSD, 1TB HDD
Your first virtualization server computer does not necessarily need to be a T3600 model. This article calls out a few specific models that are good value points for these desirable hardware specifications, but you can use any model computer so long as you keep in mind the critical performance aspects. A virtualization computer should have a high CPU core count prioritized over raw CPU speed. At a minimum, you’ll want 4 cores, on a CPU that supports VT-x instructions, like an Intel Core i5-2300 series or higher. RAM (16GB at the minimum) and hard drive space (at least a few hundred GB) are critical to hosting multiple VMs. Using an SSD for a hard drive provides a very helpful performance gain. I picked up some extra RAM at the shop for my machine, and I’m planning on upgrading the CPU to an 8-core in the near future.
Another model you might consider is the HP ProDesk or EliteDesk series of towers, that offer a friendly price point for a readily-available machine, with decent virtualization capabilities. If you’re interested in the louder rackmount server blades, check out the Dell Poweredge R720 or R710. These offer a similar price and value point and generally boast a higher CPU core count than the T3600. Downsides of running a server blade at home include higher power consumption, additional hardware complexity, and loud fan noise. For the sake of having a beginner-friendly lab, I don’t think a person’s first VirtualBox host should be an enterprise server blade unless the learner has worked in IT in the past.
Operating System
Next, I needed a lightweight, resource-efficient operating system (OS), so I went with Ubuntu. Ubuntu is a free, open-source OS based on the Linux architecture. After downloading Ubuntu 20.10 LTS to my Windows 10 PC, I needed a way to boot into external media to install Ubuntu on the lab computer, so I created a bootable USB flash drive using UNetbootin on my Windows PC. These steps and what follows below are all covered in the Code Fellows Ops 102 course.
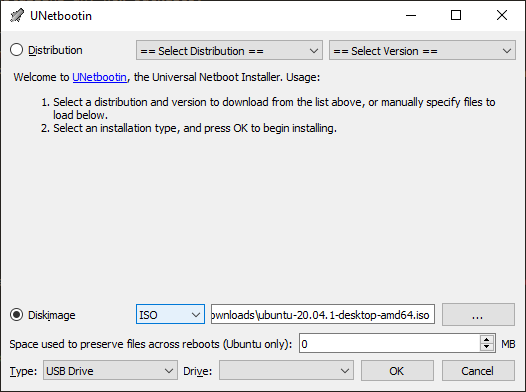
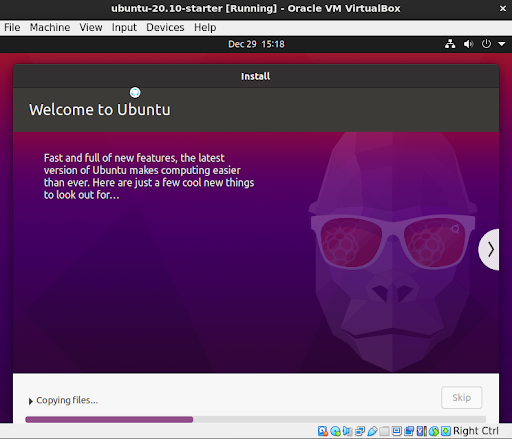
After plugging in the USB to my T3600 and booting off it, my installation process went smoothly.
Virtualization Software
For my virtualization software, I elected to use VirtualBox. This software allows me to spin up VMs of any operating system, as long as I have the installer image. I’ve tinkered with VMWare in the past, but the free version does not allow the user to export a .ova file, whereas VirtualBox does. Otherwise, the choice between the two is largely a matter of preference and brand allegiance. There are other more advanced virtualization solutions such as ESXI but for my purposes, I want to set up a beginner-friendly configuration that others can easily reproduce.
So what operating systems do we install as virtual machines?
I ultimately want to simulate a client and a server as found in most enterprise deployments. I can start with a Windows 10 PC as a basic target system. Windows 10 is now the most common OS in the business endpoint world, and Microsoft Active Directory is the most common domain deployment in enterprises. I’ll need to add more systems to this virtual sandbox, such as Windows Server 2019, but loading Windows 10 is a good start as a target, and also just to make sure VirtualBox is working as expected.
Kali Linux is a free open source Linux distribution that includes attack tools that pen-testers can use to perform attacks on computer systems. I’m loading a Kali VM early on to be able to perform basic attacks. I can also use Kali Linux against cloud targets, such as Hack The Box.
Let’s make it happen!
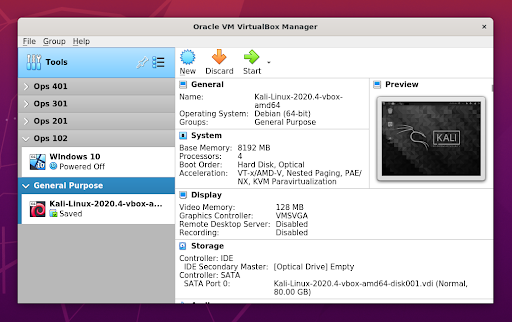
I installed Virtualbox by downloading the .deb file from within Ubuntu, running it with a double-click. Once VirtualBox was installed, I next deployed a Windows 10 VM and a Kali Linux VM. The Windows ISO is easily generated using Microsoft’s Media Creation Tool, and the Kali Linux ISO is downloadable at Offensive Security’s site. Once you have an ISO image, installing a new VM consists of selecting “New” on VirtualBox Manager GUI, selecting the OS, then pointing VirtualBox to the corresponding ISO file. The remaining installation procedure will be unique to each OS. If you haven’t done this before, lots of great step-by-step guides for this are easily searchable.
Here’s what VirtualBox looks like, once you have completed the setup for a Windows 10 VM and a Kali Linux VM:
To Be Continued
This is the humble beginning of our cyber range, but it’s not complete yet! In Part 2 of this series, we’ll explore how to remote into your lab computer using XRDP and create a firewalled network subnet using pfSense within VirtualBox.